*Learn how to draw a net for a cone.
Now it starts to get really fun. In this step you get to move to the third dimension.
You will break your building up into parts and design the flat patterns or NETS that will fold up into these parts. We recommend that you use no more than four different polyhedral parts. Now, you may need multiple nets of the same surface if, for example you are using several columns in your building, or if you have several prisms of the same shape in your building etc. Too many different shaped parts in the same building can make it look cluttered, so keep it to four.
It's real important that you do a paper trial of your net before you draw it on good art paper or try to transfer it to poster board. Use paper to figure out all of your angles, edge lengths and slant heights etc. Then draw it and cut it out to do a "dry fold". Your dry fold will tell you if your net is going to work.
Once you start to construct your nets, you will realize just how important all those elevation measurements are.
For
example.
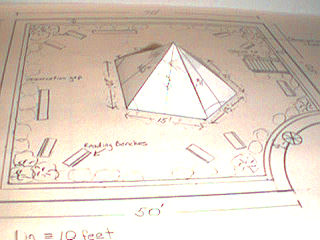
When we started the net for the pentagonal glass pyramid over the atrium
of our library, we looked at the floor plan and the top elevation:
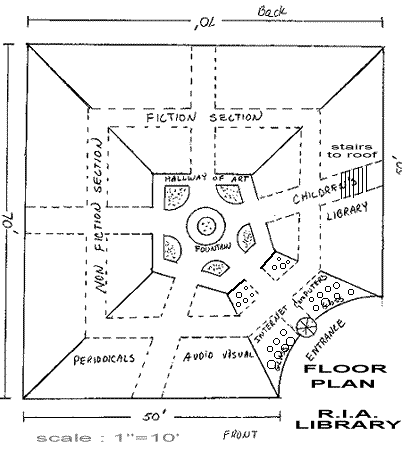
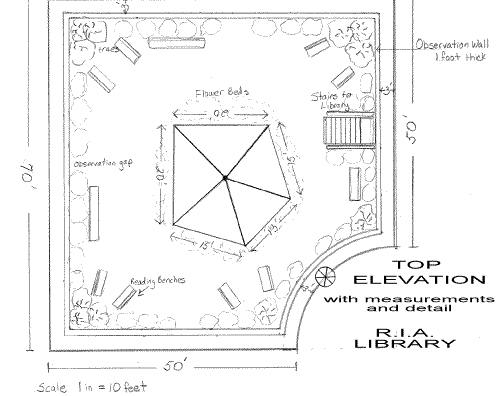
When we started to lay out the net that would fold into this pyramid, we noticed that the pentagon had NOT been drawn as a REGULAR pentagon. The sides were different lengths.
It turns out that this was part of the design that we had overlooked. Well we figured that the pentagon was close enough to a regular pentagon that we could just go ahead and make it regular even though the drawing had different dimensions. So we did a paper sketch of the net just to see if it would work. We figured out what the slant height of the triangular sides would have to be by using the Pythagorean Theorem and the fact that the pyramid was to stand ten feet high. We then cut it out and folded it up. Look below to see our sketch.
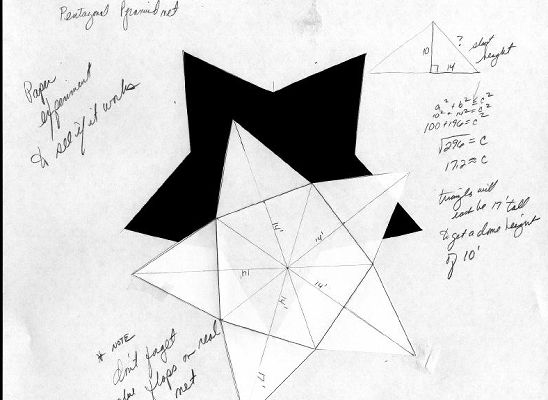
Well, it folded into a pyramid that was one inch high, so it would be ten feet high in reality due to our scale of 1 in = 10 feet. We were excited! It was working!
Then we laid the base of the pentagon on the floor plan and IT DIDN'T WORK. Changing the measurements had destroyed the design, and we had to start over. Notice below how the base of the pyramid will not fit onto the five parts of the library the way it was designed.
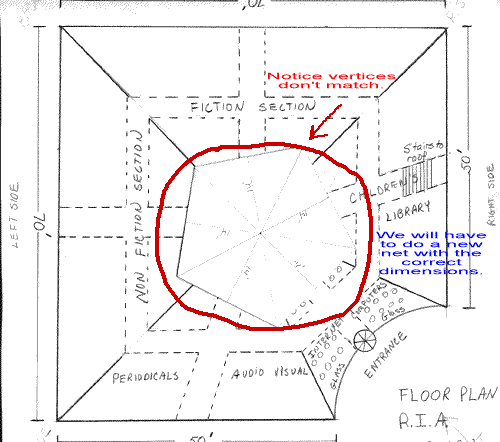
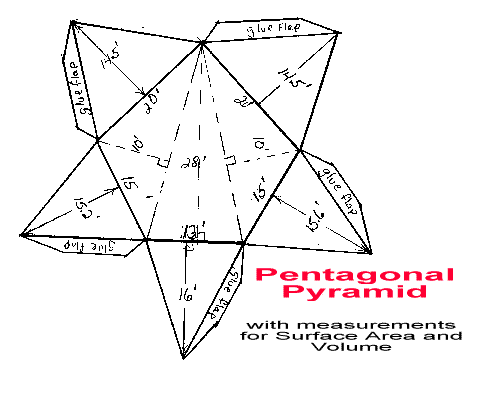
We didn't want to redesign the building, so we worked on a new net with the correct dimensions. It took a bit more Pythagorean Theorem figuring because each slant height of the triangular faces was a different length. The new paper design looked like this.

You can see it took a lot more figuring than the design for the REGULAR pentagonal pyramid. This is why we encourage you to use regular polygons in your design.
Next we cut out the paper sketch and do a "dry fold" to see if the vertices will meet. (If we did the math correctly they should.)
Yeah! It fits perfectly. These measurement will work, so we draw the good version on art paper along with all the measurements needed to find the surface area and volume of the pyramid. Here it is.
If you want to see the rest of our nets, click below.
- Fiction Section/Nonfiction Section (congruent trapezoidal prisms)
- Children's Library/Periodicals & Audio Visual Section (irregular quadrilateral prisms)
- Entrance and Internet Computer Section (trapezoidal prism with arc cut out of one base)
- Click HERE to learn how to draw a net for any cone.
*NOTE TO TEACHERS:
You may want to require your students to construct their building using four different polyhedral parts so that you can evaluate their mastery of various net making and surface area and volume formulas.
Home | About
Us | Algebra| Dictionary | Games | Geometry | Gym | Humor | Lab | Magic | Natural Math | PreAlgebra | Resources | Teachers Only | Toolbox | Treasures | Videos | Wonders | Writings |
Copyright © 1999-2020 themathlab.com